Instagram

Instagram

Monday, December 17, 2012

Party Panko Chicken


Here’s a chicken recipe that works well for dinner or holiday parties.  The Azuki BeaN Mamas are preparing some today! 

Party Panko Chicken


3 lbs of chicken breasts
1½ C of flour
¼ C of oil (enough to cover chicken halfway up sides when frying)
3 eggs
3 C of Panko – Japanese style bread crumbs
1 C teriyaki sauce

Directions: 
1.     Cut the chicken breasts in half lengthwise.  This way you get thin filets so they will cook faster
2.     Get 3 pie tins or baking pan.  Set up one with flour, one with egg, one with panko
3.     Have a large skillet for oil and a smaller pan to heat teriyaki sauce
4.     Then assembly line style, the chicken goes from flour to egg bath to panko and into the oil
5.     The chicken should sizzle when it goes into the oil pan
6.     When it is golden brown move it to the simmering teriyaki sauce coating both sides, then on to a platter
7.     Add more flour, egg, panko, oil or teriyaki sauce as needed
8.     Let cool a little, and slice onto platter
9.     It’s ready to be served hot or at room temperature

This is yummy for a special occasion.  If we're just having dinner with our family we let the little BeaNs dip it in the sauce by themselves, sometimes using tonkatsu dipping sauce or just salt and pepper.   

We hope you enjoyed the recipes we’ve shared with you in 2012.  We’re taking time off until January 7th to be with our families and enjoy the holiday season.  Our hearts go out to those who may not have the chance to be their families this holiday or who may have lost someone this season.  The Azuki BeaN Mamas dream of peace and love for 2013!

Monday, December 10, 2012

Azuki Bean Tea Cakes

          The season is in full swing and we need to be ready for unexpected holiday guests.  Chef Azuki always has something baking in her oven.  Today I enjoyed her delectable creation that mixed a hint of green tea with a shot of azuki bean sweetness.  These tea cakes are light, fluffy and simply the perfect snack to have with your favorite tea.

Azuki Bean Tea Cakes


2 tea bags of your favorite green tea
3/4 cups hot water
3 egg yolks
1 tsp. vanilla
3/4 cups sugar
1 tsp. baking powder
1/4 tsp. salt
3 egg whites stiffly beaten
1/2 tsp. azuki bean paste for each tea cake

Directions
1.  Preheat oven to 325 degrees
2.  Put tea bags in hot water and steep for ten minutes
3.  Cool tea
4.  Add cool tea and egg yolks to bowl and lightly mix
5.  Mix in vanilla, sugar, flour, baking powder, and salt
6.  Mix egg whites for about 3 minutes to get stiff peaks
7.  Fold in the stiffly beaten egg into the batter
8.  Pour the mixture into round or square cupcake tins lined with paper baking cups
9.  Fill each paper cup 1/2 full
10.  Add 1/2 tsp of azuki bean paste on top
11.  Cover with remaining batter until each cup is 3/4 full
12.  Bake for 17 minutes ( Time may vary depending on oven)
13.  Cool in pan for ten minutes

          These azuki bean tea cakes are now ready to serve.  Maybe you can even leave Santa a couple of these tea cakes with green tea this year.  I'm sure Santa enjoys a little variety!

BeaNspiration:  Try something new this holiday!


Monday, December 3, 2012

Go Go Go Fried Rice


        ‘Tis the season to enjoy holiday cheer with our friends and also to shop, shop, shop!  Here’s an easy recipe you can make with left over rice from a Chinese take out get together.  White jasmine rice gets a little hard when you try to save it for leftovers, but by adding a few ingredients you can magically transform it into delicious fried rice. 

Go Go Go Fried Rice


5 strips of bacon slice into 3/4” pieces (Reserve 2 Tbsp. bacon oil)
5 Cups of Rice
5 small stalks of green onion
2 eggs
1 Tbsp. Shoyu (soy sauce)
¼ tsp. salt (optional)
1/8 tsp. pepper (optional)

Directions:
1.     Grab a pan or wok and fry up bacon!
2.     Remove bacon and discard all but 2 Tbsp of oil
3.     Heat oil on medium heat
4.     Add rice
5.     Add bacon and green onions
6.     Gently stir
7.     Open up a hole in the center of the rice so you can see the bottom of the pan
8.     Lightly scramble two eggs and put it in the center
9.     Continue scrambling while cooking
10. When it is barely starting to cook and still a little runny start mixing the rice into the egg.
11. Add shoyu (soy sauce) and mix in
12. Taste it 
13. If you think it needs a little more flavor add salt and pepper to taste

The fried rice is ready.  Don’t forget to turn off the stove, and then EAT!   The rice also lasts better in the refrigerator fried up this way.  But if you have Little BeaNs (kids) at home they will probably devour it for their afternoon snack.  
Chef Azuki came up with the name Go Go Go Fried Rice because we added 5 strips of bacon, 5 cups of rice & 5 stalks of green onions to this.  “Go” is the word for the #5 in Japanese.  It’s easy to remember this quick 5 ingredient recipe, just think Go, Go, Go!  You’re ready with the fried rice and now go out and shop, shop, shop!

BeanSpirations-Make time for magical moments this holiday season!


Monday, November 26, 2012

Ginger Teriyaki Chicken


Today I’m blogging on my own and thinking about what to make for dinner.  My old standby is teriyaki chicken wings or drummettes.  I’ve been in the mood for ginger lately so I’m going to put in some grated ginger into the teriyaki chicken.  I recently learned that ginger is a warming food and one that is good to eat at this time of the year when the weather is getting cooler.  It’s also said to be good for nausea, vomiting, indigestion, prevention of flatulence, good for congestion and more.  I did check Wikipedia and The People’s Pharmacy Guide to learn it is not good for people with gallstones and may cause possible increase bleeding.  There’s so much to learn about food chemistry and my interest in plants, herbs and old family remedies is increasing.  Something is telling me to eat more ginger, so I think I’ll add a little ginger into my chicken today and see what happens!

Ginger Teriyaki Chicken

1 package of chicken wings or drummettes
½ Cup Low Sodium Soy Sauce
½ Cup Sugar or Mirin
1 tsp. grated ginger
¼ tsp. sesame oil


Directions:
1.     Preheat oven to 350 degrees.
2.     Stir together soy sauce, sugar ginger and sesame oil
3.     Cut chicken wings separating the drummettes from the other portion and cut tips off and discard. 
4.     Put the chicken into the mixture and soak for 15 minutes
5.     Put in a foil lined pan and cover with foil
6.     Bake for 20-30 minutes
7.     Remove foil cover and bake for additional 20 minutes.

I love this easy recipe and the flavor of grated ginger adds a special zing to it.   If you love the flavor of ginger, add more grated ginger next time.  I thought ginger was really strong was I was a kid but am liking it more and more as I get older.  I drank my ginger tea this morning with ½ tsp. of grated ginger, ½ tsp. of honey, boiling water and a dash of low fat milk.  It was a great way to warm up in the morning.  Ginger and Satsuma tangerines are my preventative measures to keep away cold and flu bugs this fall and winter.  Don’t know if it works for sure but the flavors just seem right to me for now; )  I’ll let you know how it goes.

BeaNspiration:  Find your way to health!
Blogger BeaN


Monday, November 12, 2012

Persimmon "Kaki" Bread


Chef Azuki would like to share one of her favorite recipes.  This delicious bread warms the heart and tummy during this time when the “Kaki” or Persimmon is in season.  I remember my mom getting a lot of persimmons and eating them enthusiastically both fresh and baked into breads.  Hope you get the chance to enjoy them too this season!  

Persimmon"Kaki" Bread


2 C flour
2 ½ Cups  sugar
2 tsp. baking soda
½ tsp. salt
2 tsp. cinnamon
½ Cup vegetable oil
1 tsp. vanilla
3 beaten eggs
2 cups persimmon
1 cup chopped nuts

Directions
1.     Pre heat oven to 350 degrees
2.     Chop persimmon and nuts
3.     Mix them together with other ingredients
4.     Spray a loaf pan with PAM spray
5.     Pour in mixture
6.     Bake at 350 degrees for 45-50 minutes

Enjoy some delicious persimmon bread.    Veteran’s Day is today.  Maybe there’s a special veteran you can share this nice treat with.  Chef Azuki and I (Blogger BeaN) would like to thank all the Veterans and remember those who have passed on.  We are so grateful to you!  

Chef Azuki and I will be on vacation next week.  We will have a new recipe for you on Monday, November 26th.  Happy Thanksgiving to you all! 

BeaNspiration:  Love and Loving Memories Last Forever!

Monday, November 5, 2012

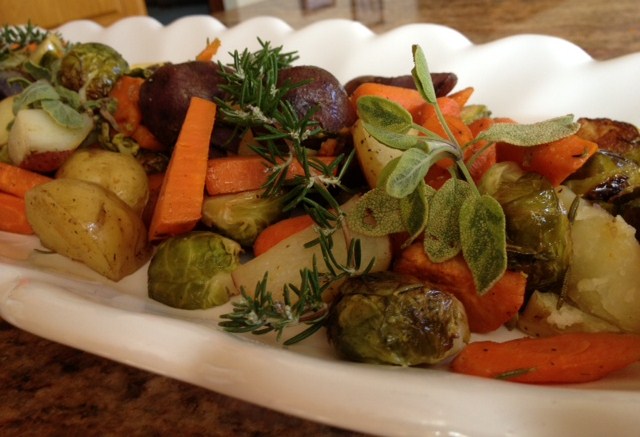
Roasted Fall Harvest


It’s November already and time fell back this weekend!  I love the time change!  I woke up before 6:00 a.m., grateful for the chance to ease my way into this beautiful autumn day.

Today Chef Azuki and I started thinking about simple Thanksgiving recipes for the family’s get together.   I’m doing Thanksgiving this year with the less is more mentally.  Turkey, stuffing and this delicious vegetable dish, that’s it!  Roasting our fall harvest brings out the sweetness of the vegetables!  Thank you to all the farmers for bringing us a bountiful harvest!

Roasted Fall Harvest


1.5 lbs of small potatoes cut into bite size pieces
14 brussel sprouts cut in half
1 yam cut into bite size pieces
14 baby carrots cut in half or thirds depending on size
2 sprigs of rosemary
3 Tbsp. olive oil
1 tsp. garlic salt
¼ tsp. pepper

Directions:
1.  Preheat oven to 400 degrees
2.  Chop all the vegetables
3.  Put into baking pan
4.  Take leaves off of rosemary sprig and sprinkle over vegetables
5.  Add olive oil, garlic salt and pepper
6.  Thoroughly toss the vegetables in olive oil
7.  Roast in oven  for 40-45 minutes (gently toss once after 20 minutes)
8.  Place on a platter and garnish with fresh herbs

 BeaNspiration:  Be Thankful Everyday!  


Monday, October 29, 2012

Crispy Pumpkin Delight


Boo!  Guess what’s right around the corner? It’s Trick or Treat Night.  Have some little BeaNs coming over or going to visit at a friend’s house?  Make these festive party treats that burst with pumpkin flavor.  My little BeaN is allergic to nuts so Chef Azuki made this batch with a secret ingredient – Rice Krispies!

Crispy Pumpkin Delight


1 (1 lb. 13 oz.) can pumpkin
1 (12 oz. can) evaporated milk
1-cup sugar
3 eggs
1-teaspoon cinnamon
1-cup moist yellow cake mix
1½ cups of Rice Krispies cereal
1½ sticks of butter melted

1.     Mix together pumpkin, evaporated milk, sugar, eggs and cinnamon
2.     Pour the mixture into 9” by 13” pan lined with wax paper
3.     Sprinkle with dry cake mix on top of the mixture
4.     Sprinkle Rice Krispies on top of cake mix
5.     Pour melted butter evenly on top
6.     Bake at 350 degrees for 1 hour
7.     Completely cool
8.     Invert pie onto cookie sheet
9.     Remove wax paper
10. Cut into 1” squares
11. Put each square into a paper cupcake cup

Frosting:
1 (8 oz.) package cream cheese, softened
¾ cup Cool Whip
1 cup powdered sugar
Candy Corn

1.     Mix cream cheese, Cool Whip and powdered sugar together
2.     Put the frosting in a cookie press and squirt out a flower on each square
3.     Top with a candy corn or candy pumpkin. 

**My little bean is not highly allergic to nuts so I don’t have to be too careful, just no actual nuts in it.  I don’t know if the cereal, canned pumpkin, cake mix or anything else is safe for all those allergic to nuts, but I’m sure you parents know which ingredients are good and not good for you little BeaN! 


BeaNspiration:  This fall, add a little pumpkin to your life!